

A Practical Guide to “Light” Usability Testing — Part 1
What follows is a hands-on guide to “light” usability testing. Few people in Italy talk about “light” usability tests, which Steve Krug calls “do-it-yourself” and Jacob Nielsen calls “simple testing”.
It’s worth knowing that everything I’m about to write comes from the work of Steve Krug, who covers the topic in technical depth in his book Rocket Surgery Made Easy.
Let’s dive in.
It’s worth knowing that everything I’m about to write comes from the work of Steve Krug, who covers the topic in technical depth in his book Rocket Surgery Made Easy.
Let’s dive in.


- What are we talking about?
- It doesn’t have to be run by a UX Designer?
- Other benefits of monthly simple testing?
- Why is it great for startups?
- A few last things before we start
- The guide
- What a “do-it-yourself” usability test is
- Equipment list
- Recruiting participants
- Preparing tasks and scenarios
- Tips for writing tasks
- Tips for writing scenarios

What are we talking about?
Usability tests are run by UX Designers. They usually interview a sample of around 8–12 candidates, ask them to perform specific tasks on the website, record what they collect, and give the client a very detailed presentation of the site’s critical flows, plus a report with fixes for them. The whole process can take about three weeks.
We’ll talk about the “light” version of all this: it takes one day, anyone can run it, and it’s no less effective. Quite the opposite.
The “light”, or “do-it-yourself”, test differs in these ways:
- You do it in one day
- There are only three candidates.
- You do it once a month.
- It doesn’t have to be run by a UX Designer.
It doesn’t have to be run by a UX Designer?
Let me clarify: If we can afford to pay a usability professional to run the tests, great. They will certainly do a better job than anyone attempting what you’re about to read.
But we want:
- One usability test a month.
- These tests to shape your product’s development roadmap.
- It to be an in-house team resource.
- And anyone to be able to run these tests.
It’s hard to pay an outside professional once a month for this. Above all, the tests you’re about to learn are much leaner. Anyone can run them.
As Jacob Nielsen puts it:
Everyone should do “_simple user testing (debugging a design)_”, while usability experts shouldn’t even spend time on such simple techniques. They have much harder things to do, like qualitative and comparative tests, developing new methodologies, and so on.
Besides, who has UX Designers on their team? Raise your hand. I mean people who handle personas, user stories, heuristic evaluations, user testing, user flows, site flows, etc., and run studies over time.
For the average Italian startup, the UX Designer is whoever makes the wireframes. That’s a serious problem, and it would deserve an article of its own. Most startups in Italy are building a house without an architect. That’s the reality. This isn’t meant as criticism, but as a starting point for doing things differently.
Back to Nielsen: “debugging a design” doesn’t just mean showing proposals to the team. You need to get out of the box as soon as possible. You need to have your products tested as early as possible and consistently over time.
Remember that the term MVP (Minimum Viable Product) was coined to deliver a product as soon as possible that is testable by human beings outside our team.
Other benefits of monthly simple testing?
- Of all the things you can do, usability tests are among the best things we can do for our website.
- The idea we have of our product is very different from the one other people have.
- Watching a person use your product live is eye-opening, and it brings the whole team into closer alignment (where opinions often differ).
Why is it great for startups?
Because a startup nurtures a single product, and usability tests should be run over time, continuously, every month. They will go hand in hand with the product’s history.
It’s harder to set this up for an agency that builds websites for others. Clients rarely understand the importance of testing, so there won’t be a budget for it.
A few last things before we start
There would be plenty more to say before starting (notes on Agile iterations, remote testing, resource costs, comparisons between “light” tests and full tests, etc.), but for that I recommend reading the book by Steve Krug directly.
The article you’re reading is really a summary of a book, entirely the work of Steve Krug. Steve Krug has run thousands of usability tests in his life, and has tested and re-tested the “light” version we’re about to cover.
Running small usability tests every month instead of a big one every six months, or every year, is a truly Agile approach. We could call it Agile User Testing.
What’s the point of spending months and months developing products for humanity when we don’t know a single person who uses our website? Who are we building these products for? Our own personal glory? Having the courage to open up to user testing as early as possible also means putting our technology at the service of humanity, and giving our work as developers a nobler meaning. Few people understand or share this. But now is not the time to explore this topic further.
Right, let’s get to the guide.
The guide
- What a “do-it-yourself” usability test is
- Materials you’ll need
- Recruiting participants
- Preparing tasks and scenarios
- The test
- The briefing
- A final thought
What a “do-it-yourself” usability test is
Let’s start with the name, “do-it-yourself”: it means we do it ourselves.
The other name, “light”, means it’s a condensed version.
Here’s how our testing day will go:
We recruit three participants (only three? Yes, we’ll explain why shortly).
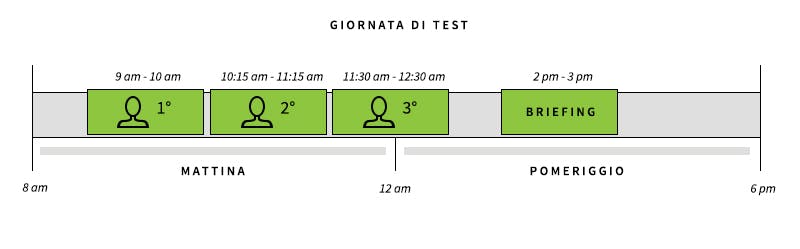
We spend a morning with them, one hour each with a fifteen-minute break in between.
For each one, you (known as the Facilitator) will sit alongside and run the test. You’ll run this hour following a well-defined structure (which we’ll cover later in the article).
While you do this in one room (called the Test Room), another room (called the Observation Room) hosts your colleagues, your team.

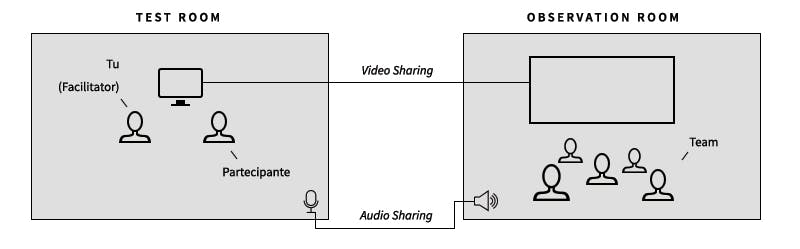
In the Observation Room, a white wall will be used to project the screen you’re sharing with them. The same goes for audio, which will be captured in the Test Room and shared in the Observation Room.
Why audio? Because participants will think out loud (_Thinking Aloud Protocol_), and their stream of consciousness matters for our analysis.
When the morning is over there will be a lunch break, followed by a briefing with all the morning’s observers (the team). You’ll lead the briefing, and we’ll explain how it works shortly.
Equipment list
For the Test Room we need:
- A computer for the test
- Internet access
- Screen sharing software
- Screen recording software
- A microphone
- Speakers
- Audio sharing software (such as Skype)
For the Observation Room:
- A projector
- A computer for screen sharing
- Speakers for audio sharing
Recruiting participants
The first question might be: Only three users?
Yes. Or rather, over the years (and thousands of usability tests), Steve Krug concluded that it’s a number that works.
The reasons are:
- The first three users usually already spot most of the issues, because these are most often related to the visual layout.
- Better to run more small tests than fewer big ones.
- Working with three users lets you do everything in one day (tests in the morning, briefing in the afternoon).
- Having fewer test results lets you process everything in a single afternoon briefing and tackle things a bit at a time. Too many results create confusion and stress, especially during the briefing, and take more time.
The second thing that may come to mind is: Do the three users need to be targeted?
In other words, the types of users who usually use the website?
The answer is no, not really, not always.
Meaning we shouldn’t obsess over it. Many issues concern technical aspects of layout, navigation and readability, and unless your website is written in Japanese, your pool of potential participants is very wide.
Try to vary the audience, especially because most of the time you think you know who your audience is, and you also think you know their level of technical familiarity with the web, but that isn’t the case.
That said, you should find three participants and schedule them as follows:
- The first at 09:00.
- The second at 10:15.
- The third at 11:30.
Let’s move on.
Preparing tasks and scenarios
Before starting the test, you need to write the tasks and scenarios.
What are they?
Tasks are sentences that summarize what the participant has to do.
They must be very clear, and they stay with the Facilitator (you) and the Observation Team. They won’t be shared with the participant.
Scenarios, on the other hand, are what gets read to the participant.
Scenarios are one or more sentences that set up a context in which to carry out the task.
For example, say we’re testing a website that offers renewable energy consulting:

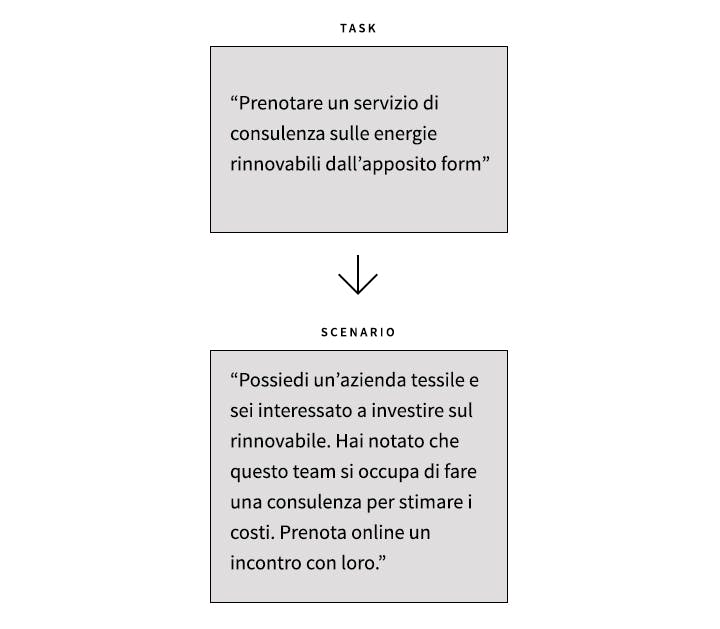
Some people may know tasks as Use Cases.
Tips for writing tasks
- Start with the most fundamental tasks: the most important things people do on your website.
- Write down the problems that keep you up at night, the ones you’ve never been convinced by.
- Go around the whole team and everyone who knows your website to uncover new tasks.
Tips for writing scenarios
Scenarios are simple: they make the participant’s job easier. The examples above are enough to get the idea. Just add context and any extra information to a starting task. Always be clear and concise, and avoid technical terms.
Print the tasks and scenarios for each observer on the team and for yourself.
Go to part two
Everything is set for test day. In part two of this guide we’ll see how to run the test session and how to lead the briefing. [Continue reading](/blog/2016/11/02/guida-pratica-test-usabilita-parte-2/)


