

React JS: a tutorial for newbies
As the title suggests, this post is for people with very little programming experience (a bit like me, as I've only been exploring this world for six months). It is, to all intents and purposes, a small tutorial for newbies! You only need a little background: HTML, CSS and basic JavaScript.
Note: in the following examples we'll use some of the new features ES6 brings to JavaScript, but you can use React with ES5 just as well.
Note: in the following examples we'll use some of the new features ES6 brings to JavaScript, but you can use React with ES5 just as well.


What is React
React is a JavaScript library created by Facebook and Instagram (https://facebook.github.io/react/) that lets you build a single-page application (Single Page Applications (SPA)) using a structure that splits it into dynamic, reusable components.
A React component is a JS class that extends the Component class provided by React. A component represents and defines an atomic block of HTML, along with any dynamic behavior tied to that fragment (click events, for example). Components are like little Lego bricks that you can combine however you like to build applications as complex as you want. A component can be isolated and reused, and it consists solely of JavaScript methods. The key method is render(), which simply returns the bit of HTML to display.
The syntax used to define components is called JSX: React's creators developed it to make it easier for JavaScript code and HTML markup to work together inside components. Code written in this syntax then needs to be compiled so that it becomes plain JavaScript.
Creating a component
To create our component and render it on the HTML page, we need a div with an id in our HTML file. In the JSX file, we'll connect the React component to the div through that id, as in the example below. This tells the browser to render it on the page inside the corresponding tag in the DOM.
In JSX, HTML tag attributes are practically the same as in HTML syntax, with a few exceptions such as "class", which becomes "className" in JSX. The HTML-like syntax is wrapped in parentheses, while the parts containing JavaScript are enclosed in curly braces (as we'll see later). render() always returns a single div, inside which you can have as many tags and elements as you like.

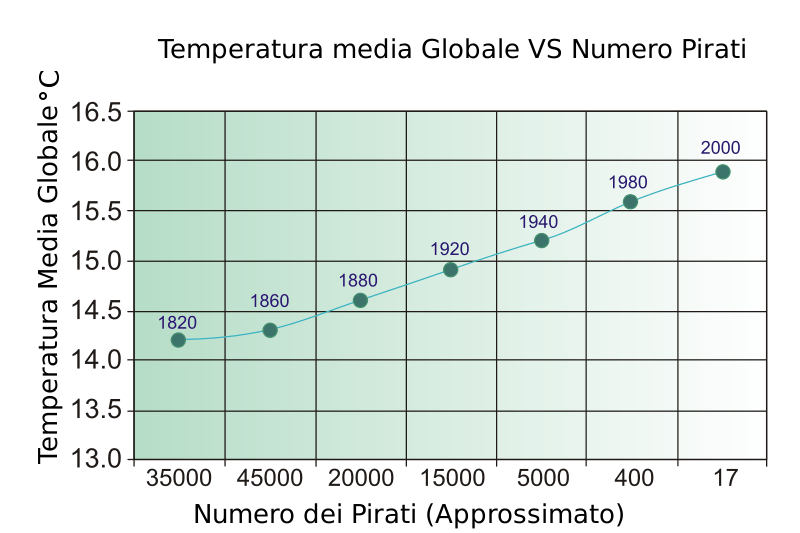
Example: pirates on the brink of extinction
If we wanted to build this chart with React, we could display the various dates and, when you click on each one, show the corresponding temperature and number of pirates.
We'll need two components: one will render the dates and hold the logic that links each date to a specific number of pirates and a specific temperature, while the other will receive the instructions about the date click event, the pirates and the temperature, and render the selected elements accordingly.
The first component will act as the "parent" and will contain the link to the second component, the "child", which depends entirely on the first.
React's structure (called the virtual DOM) lets us update a component every time its content changes, without refreshing the whole page. To do this, we need a method inside the component where we store the changing data, and specific HTML attributes assigned to the elements that will change. These attributes will then hook into other methods we define in the component, which will take care of making the changes.
State and props
In our example, the independent changing data are the dates. When they change on click, they trigger rendering the related pirate and temperature information in the DOM. So we can store the information for each date in a "DATA" object, while inside the parent component we'll use React's this.state = {} property to store the changing data as key-value pairs.
This way we can later take advantage of the methods React provides to interact with the data in the "state" and change its content as we see fit.
Since we want to use the keys of our DATA object to render the dates in the HTML, it would be nice to find a way to use the JavaScript map() method (Array.prototype.map()) on those keys and display its return value directly in the HTML of render(). And we can! Just wrap the JavaScript code in curly braces at the point where you want its output to appear in the block of DOM the component manages, and you're done.
In this particular case, we'll define the map() callback in a component method, which will then return a bit of HTML in the component's own render().
To assign the click event to each date, we give the clickable tag the onClick attribute. In this attribute we call the component method where we'll define the logic that changes the state, along with any other changes we want to trigger after that event.
In the example we'll call this method handleClick(), and inside it we'll call React's setState() method, which is what lets us change the state data on every click event. Just pass it an object containing the state keys you want to change, with their new values.
To recap, every time a date is clicked, the onClick attribute of the selected div calls the HandleClick() method, which in turn calls the setState() method that changes the component's state.
Every time the state changes, and as soon as it does, React automatically checks the return value of the component's render() looking for content to update based on the new state. If there is any, it automatically triggers a new render(), updating only the bit of HTML that changed.
(I have to admit it and apologize: in the following example, before the return of render(), I also added three lines of code that use Classnames, a small utility that manages CSS based on state changes, just to add a bit of color to the preview. I'll also use it in the last example to fill the preview with a variable number of pirates. Here is the link to the GitHub repository, with a simple, clear usage guide.)
Now that our parent component's state changes based on the selected date, it's time to create the child component that shows the right number of pirates and temperature.
We instantiate it in our JSX file just as we did with the first component. To hook it to the parent, simply define it inside the parent's render() return value, using the same syntax as any HTML tag. If we call it "Child", it will appear in the HTML block wherever we insert <Child />.
We also need to pass our child component the information the parent holds about the currently selected date, along with the related pirates and temperature. To do this, we use attributes assigned to the Child tag, whose names are chosen arbitrarily and whose content is a piece of information from the parent component.
This way, the child component can access data belonging to the parent through these "bridge attributes", or props. In our example, Child's props will be this.props.pirates and this.props.temperature, and they will hold information that varies according to the parent component's current state.
Every time the parent's state changes, the content of the child's props is updated automatically as well. And since the child's render() displays the content of the props, it will also update automatically based on the new information received, following a simple one-way data flow.
Done! The components interact with each other, rendering different content in the DOM depending on what we click, with no refresh and all on a single page. From here, the complexity of the interactions and the number of components can grow as much as you like, letting you build complex, efficient applications.
If you want some inspiration on what this library can do, the react.rocks website has plenty of interesting ideas. (:


